Are you having trouble getting your Keurig to turn on after descaling? You’re not alone. Many Keurig users have reported this issue, but fear not, as there are a few simple troubleshooting steps that can help get your machine back up and running.
This is a common problem with the Keurig K-Supreme, but can also occur with other models like the K-Express and K-Slim.
How To Fix a Keurig That Won’t Power On After Descaling?
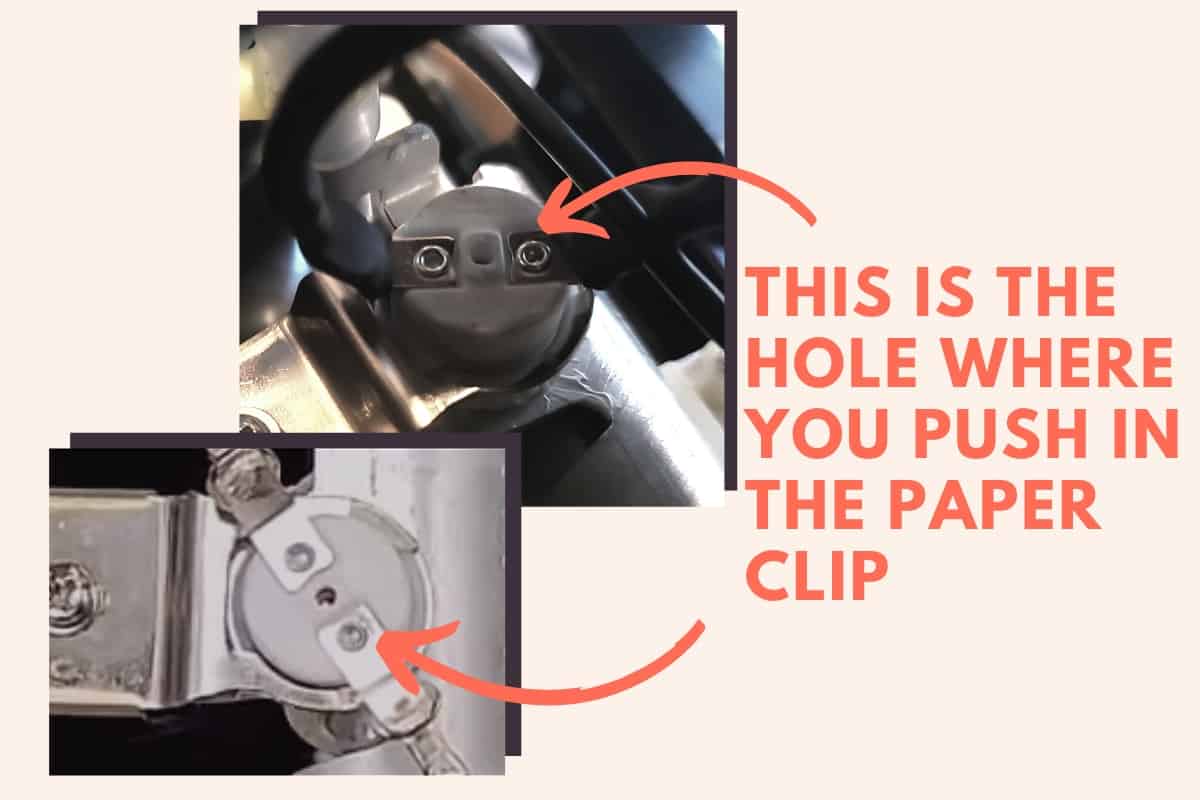
The problem is that sometimes the “add water” light does not work, causing the heating element to overheat because it cannot draw water, causing the thermal switch to trip. To fix the thermal switch, take the side cover off the Keurig and press the switch with a paper clip.
I’ll go into some more detail on how to do this below.

Table of Contents
- How To Fix a Keurig That Won’t Power On After Descaling?
- How To Prevent This Problem From Happening Again?
- Conclusion
Disassemble The Cover of The Keurig Coffee Maker
The newer Keurig models are all assembled somewhat similarly. The side cover is attached to the base with a pair of pins that hook into the base, and with some effort, you can pop the sides out with a screwdriver.
This problem is most common with the K-supreme models, so I will explain the disassembly of the supreme models in a bit more detail:
How To Disasamble the Keurig K-supreme
Unplug your Keurig and remove the water reservoir.
There are 6 small pins that hold the sides to the base. If you look at the K-Supreme from below, you can see these pins. The pins are hooked in to hold the side cover in place.
Unhook the pins by inserting a screwdriver and pushing them in, at the same time try pulling up the side cover so that it pops out and the hooks are released. You can also try to get the screwdriver between the base and the sides to get the pins out.
Now that all the pins are unhooked, you can pull up the side cover in its entirety. You may have to open and close the lid a few times to get the cover off completely.
How To Disasamble the Keurig K-supreme Plus
Unplug your Keurig and remove the water reservoir.
Take a flathead screwdriver to take off the top cover, it is attached to the sides with small pins, you just have to wedge the screwdriver between the top and the side cover to pry it off.
Then pull up the part of the side cover where the water tank is normally attached. Once you have this part out, you can loosen the rest of the pins attached to the base with a screwdriver.
Once all the pins are unhooked, you can pull the side cover off the base.
Reset The Thermal Switch
Look for the small white cap with a hole in the middle and a wire on each side (see photo below). From the front of the coffee maker, you will find it on the right side, attached to the spiral heating element. You should be able to see it if you look in from the side.
Take something like a paper clip, needle, or toothpick and push it into the center hole. You won’t hear a sound like a click when you push it in, this is normal. If you push it in enough, the coffee maker is now reset and should be able to turn it back on.

Test If The Keurig Is Working
Plug your Keurig back in and press the button, your coffee maker should now turn on.
If it works, you can put the Keurig back together and enjoy a cup of coffee again. If it didn’t work or it worked for a few seconds and then went dead again, there may be something more broken about your coffee maker.
Your best bet then is to contact Keurig customer service. They will probably send you a new Keurig if you are still under warranty. If not, they will probably offer you a hefty discount for a new one.
How To Prevent This Problem From Happening Again?
If your Keurig doesn’t turn on after descaling, it’s because the thermal switch on the heating component tripped. This happens because there is a problem in the descaling program, it keeps draining water without turning on the “add water” light, causing the heating element to overheat.
The next time you need to descale your Keurig, keep an eye on the water level. Turn the unit off when the water level drops just below an inch, wait a minute, then turn it back on and start the descaling cycle again with a filled water tank, and hope that this time the add water light works.
If you use this method, sometimes the descale light will stay on. I wrote a guide on how to get the descale light to turn off. Make sure to check out that article if this happens.
Conclusion
It can be very annoying if your Keurig does not turn on after descaling, especially since it is not easy to take off the cover to press the thermal switch. So always pay attention to the water level when descaling to reduce the likelihood of this happening. Here is a summary of the problem and solution:
- Add water light sometimes doesn’t work, causing the heating component to overheat.
- It can’t draw any water, resulting in the thermal switch tripping.
- To fix this take the cover off the Keurig and press the switch with a paper clip.
I hope your Keurig is working again and you can now enjoy a nice cup of coffee.
Thanks for reading!
